I bought Akinori (affiliate link) several years ago after having sewn Wardrobe by Me Mirri and I loved what the wide shoulders did to balance my hips. Needless to say, like most of the patterns I own I never made it. So when Wardrobe by Me asked for new tester pictures I was happy to have the motivation to sew one. I wasn't disappointed.
I've already started searching through my fabric stash to find the perfect jersey to try a knit one, the perfect light weight fabric to become a swimsuit cover up, and the perfect fabric to make a peplum version (I'm a huge fan of blouses over dresses, because they give you so many more options when you keep a Capsule Wardrobe).
PDF Features
Sorry this is such a poor quality picture. I was writing the post and realized it would be helpful to have a picture of the interior of the dress.

I am really happy with this dress as it is, but I do think I will remove a bit of length from the bodice with the next one. I'm only 5'2" and it is a little tiny bit droopy above the yoke. I'm much shorter legged than I am petite in my torso, so a lot of the time I can get by with just shortening the skirt on dresses. I hemmed this one to be just below my knees and ended up cutting off a couple inches to get it to the right length.
Hope you enjoyed my version and feel free to subscribe to my blog or leave a comment. You can also follow me on my new Instagram account Kate's Endeavors.
Happy Sewing!
I've already started searching through my fabric stash to find the perfect jersey to try a knit one, the perfect light weight fabric to become a swimsuit cover up, and the perfect fabric to make a peplum version (I'm a huge fan of blouses over dresses, because they give you so many more options when you keep a Capsule Wardrobe).
- No Trim Pages
- Large Format Print Option
- Layers
- Line Drawings
- Imperial and Metric Body and Garment Measurements Charts and Fabric Requirements
- Illustrations
- 3/8" Seam allowance
Pattern Design Features
- Size 0-24/30-54
- Designed for Lightweight Woven and works with stable Jersey as well (size down)
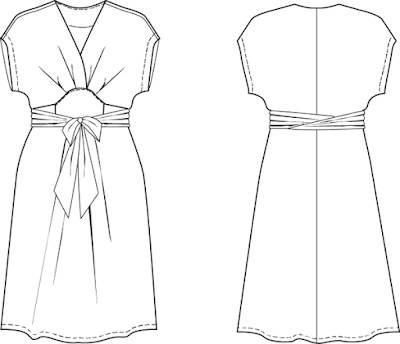
- Inset Front Detail
- Pleated Bodice
- Belt (optional)
- Dolman Sleeve
- Knee Length Pleated Front Skirt
- Single Piece Back
- Fold over front facing
- Separate back neck facing piece
- Sleeve Facing to make finishing simple
Here is a closer view of the bodice. My fabric is pretty busy, but you can see the pleats, yoke, and belt.
Wardrobe by me classifies this as a 3/4 level of difficulty pattern. I would agree, but if you are an adventurous beginner you could make this dress. Take your time marking and pleating and be patient when you are attaching the bodice to the yoke. The main difficult step is inserting the front yoke. I have been sewing a while and had to think it through clearly before starting, but it all works out. If I get a chance to make a second one I'll video how you bag the yoke, because it gives you a great finish inside the dress.
Here is a close up of just the yoke on the inside of the dress. You can also see the pleats on the skirt.
I used a rayon I picked up in the bargain section of a local fabric warehouse a couple years ago. I love wearing rayon fabrics, because they are so light and airy.
I'm always a bit nervous about any dresses that are gathered by a belt for shaping, but I think the side and back of the dress look nice. If you are shaped like me 36"/32"/45" (size 8 bust, 12 waist, 16 hips) I would make sure you use a very light and flowy fabric so that it doesn't puff out in the back.

I am really happy with this dress as it is, but I do think I will remove a bit of length from the bodice with the next one. I'm only 5'2" and it is a little tiny bit droopy above the yoke. I'm much shorter legged than I am petite in my torso, so a lot of the time I can get by with just shortening the skirt on dresses. I hemmed this one to be just below my knees and ended up cutting off a couple inches to get it to the right length.
Hope you enjoyed my version and feel free to subscribe to my blog or leave a comment. You can also follow me on my new Instagram account Kate's Endeavors.
Happy Sewing!


Comments
Post a Comment